CRUSHED STONE AND PEBBLES
Probably the most basic type of edge is the crushed stone and pebbles edge. Simply excavate the pond as usual, and then cut an angle into the top 3 inches of the perimeter. Place the boulders several inches higher than the bottom of the cut angle, and fill the void with stone. You’ll want to fold several inches of extra liner into the angle just in case you need to make an adjustment. Complete the edge by bringing mulch up to the stone.
GRANITE BLOCK EDGINGS
If you’re looking to break from the monotony of boulder edging that is typically seen in most pond designs, creative pond edging treatments using granite can provide a nice crisp look that is both interactive and easy on the eyes. Stone boulder edgings are quick and easy to build, acting as a continuous medium that can bring someone right up to the water’s edge.
To install the stone boulder edgings you first need to excavate a shelf for the stones to sit on. Ideally you want the water level to rest about 1-2 inches or so below the top of the block. Next, make sure that you run enough liner along the top shelf so that you can fold the liner around the back and to the top of the stone; tucking it just beneath ground level. The notch in the stone boulder is meant for any piping or as a conduit to run electrical lines that may need to run alongside the pond. Then, you just need to backfill behind the edging with some well-compacted soil or gravel as an appropriate base for the finishing touches.
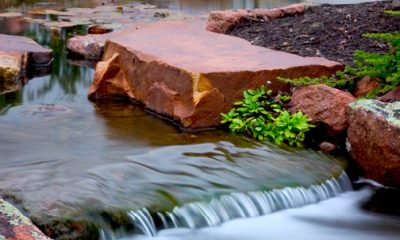
OUTCROPPINGS
When a builder incorporates an outcropping into their design, they truly are providing maximum interaction between the customer and their pond, all with an all-natural appeal. So how do you incorporate an outcropping into your design? First, we’ll assume that your stone is 6-inches thick.
In this instance, we’ll say that we want the water level 2 inches below the top of the stone. Using your site level, dig the top shelf to 4 inches below the water level. After that, you can place the liner down and tuck it up and behind the back edge, and then place your support boulders. For added protection to the liner, place a rock pad or two on top of the liner.
Keep in mind that it’s important to use appropriately sized boulders as support to maintain a level surface for the outcropping placement. Once you’ve checked all your levels you can place your outcropping and support its sides with some gravel or soil if you want to allow planting at the outcropping’s back edge.